Saturday, December 18, 2010


Snow Angel Imagine and George and Basic Shapes
.....
Base for the card Bazzill card cut @ 12 x 4 3/8 inch
Fold card in half and round the corners
.....
First layer basic shape Cricut Imagine
Pattern page 38 handbook
Printed and cut @ 5.8
Trimed to fit card and round the corners.
.....
Second layer Rectangle George and Basic Shapes page 100 handbook
Pattern page 36 Snow Angel Imagine handbook
Printed and cut @ 5.8 (round corners)
.....
Icon image page 31 Snow Angel Imagine handbook
Printed and cut @ 3.5
....
Snowman for inside of card page 11 S. A. handbook
Printed and cut @ 2.
.....
Other items used to make this card
ribbon, pop dots, adhesive, Pritt gel to adhere the bow.
I used my computer and printer for the sentiment
inside the card.


Cricut Imagine Snow Angel & George and Basic Shapes
Card base Bazzill card 12 x 4 1/4 inches folded in half
Rectangle-George and basic shapes page 116 handbook
Pattern for rectangle page 41 handbook Snow Angel
Printed and cut @ 5.8 x 4.3
Note mat basic shapes Cricut Imagine
Pattern page 43 handbook Snow Angel
Printed and cut @ 3.0
Scallop oval mat basic shapes Cricut Imagine
Print and cut base @ 2.6 colour palette Snow Angel (green)
Print and cut top layer @ 2.5 pattern page 43 handbook Snow Angel
Snowman (flip for front of card) printed and cut @ 2.2 page 11 handbook Snow Angel
I also printed and cut a Snowman for the inside of the card @ 2.0
Merry Christmas- Fundamentals Xmas stamp set
Other items used to make this card- pop dots, ribbon and adhesive
I used white card for the inside of the card cut @ 5 3/4 x 4 inches

Sentiment on the inside of the card reads
Wishing you a
Merry Christmas
and a
Happy New Year
I used my computer and printer to create the sentiment for the inside of the card. After I printed the sentiment onto the white card I adhered the Snowman to the bottom right hand corner. Then adhered it to the inside of the card.

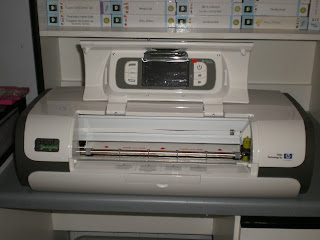
Cricut Imagine
Since the launch of the Cricut Imagine at CHA and then its release through HSN in America I knew straight away I had to have one of these. I had preordered it from Photo Contintental at Mt Gravatt here in Brisbane and it arrived last Thursday. So Thursday evening after work I went and got it. Then on Friday after the cartridges for the machine arrived at the store I went back and purchased some of the cartridges. I received an early Christmas present from my sister who was with me. She bought me a pattern cartridge Audrey for the Imagine. My husband also gave me a gift voucher and I used it to purchase other cartridges for this machine. A very special THANK YOU to my husband and sister. I love my presents.

Friday, November 12, 2010


eCraft
Jen Allyson Designs
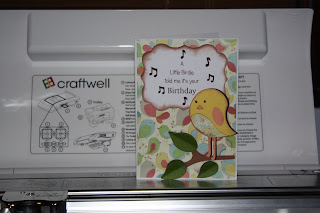
Birthday Card
Card Base 4 1/8 x 5 7/8 inch
Front and Back cover DCWV Green Stack 4 x 5 3/4 inch each
Bird- Category 6 Image 13, 14 and 15 cut a 3 inch
Branch - Category 5 Image 45, 46 & 47 cut @ 3 inch
Frame- Category 2 Image 11 cut @ 3 1/2 inch
EK success edger punch Musical Symphony (music notes)
I used Print Shop 22 to create and print the
sentiment on the frame.
I used Vera Color 55 Umber to ink around
the frame,bird and leaves.
........................
How to Print Sentiment onto the Frame using a printer
....
Create your Sentiment using a word document programme
or in this case I used Print Shop 22.
Measure the required size to fit the frame.
For this card I used
2 1/2 inch W x 2 inch D text box.
I typed the sentiment then printed it onto an A4 sheet of paper.
Adhere the frame over the printed words. ( I used low tac double
sided tape for this process so it is easy to remove the frame from the A4 sheet.)
Use a light box or other light source to check the alignment
of the print before placing theA4 sheet back into the printer.
Once you are happy with the alignment place the A 4
sheet of paper back into the printer and click print.
Remove the frame from the sheet of paper.
This process can be used to print words or sentiments on any
size or shape of card you require by adjusting the print size as required.
...............................................


Sunday, October 24, 2010


3d Collage
using
Simply Charmed Cricut Cartridge
Scarcrow cut @ 3 inch ( page 57 handbook)
Pumpkins cut @ 1 inch (page 60 handbook)
........
"Just Because" cards Cricut Cartridge
Corn cut @ 3" & 3 1/4" (page 29 handbook)
........
Paper Doll Dress Up Cricut Cartridge
Fence cut @ 1 1/2 inch (page 78 handbook)
Grass cut @ 5 X 1/2 inch ( page 78 handbook)
The Gypsy was used to get the required cut for the grass.
.........
Walk in My Garden Cricut Cartridge
Watering Can cut @ 3/4 inch (page 104 handbook)
Sunflowers cut @ 2, 2 1/4, 2.5 inch (page 100 handbook)
Assembled this collage is 5 3/4 inch (W) x 4 1/4 inch (H) approx.
I used pop dots for the Scarcrow, Pumpkins and Watering can.


eCraft by Craftwell
Tri-Fold Card
I used the eCraft to cut the flowers and the flourish.
To make this card.
......
Flowers Image 10 Fundamentals 1 cut @ 1.5 inch
Flourish Image 51 Swirls & Flourishes cut @ 4.5 inch x 2
(Cut 1 green and 1 pink)
Green base card 3 1/4 x 5 inch
Pink card 2 3/4 x 4 1/2 inch
Patterened Card 2 1/4 x 4 inch
..............
For Tri-card measurement and instructions visit scrappyjess.blogspot.com
..............
To assemble the front of the card.
Adhere the patterened card to the pink card.
Adhere ribbon (centre)
Attach onto green card base.
I used Swiss Dots (Cuttlebug) embossing folder for texture on the green flourish.
Adhere green flourish (off set/shadow) onto pink flourish.
Adhere to card.
Assemble flowers
To hold the centre circle of the flower I used tape at the back of the cut-out.
(I used a clear droplet in the centre of the flowers and pop dots to attach them on the card.)
...............
Happy Birthday Lizzie anne designs Little Bits rubber stamp set.
Cardstock DCWV- Nursery Stack
Bazill card stock
KindyGlitz - Crystalina


Saturday, October 9, 2010


eCraft by Craftwell


To make this card I used the eCraft machine and the ecraftShop Pro computer programm. The image of the sailboat was in the font file on my computer. Not sure were I downloaded it from. To make the cut I placed the shape onto the virtual mat on the computer screen and adjusted the size to fit the card. I cut the sail boat two times (pink and orange coloured paper). Then I used the Shadow/blackout feature and cut out the image using black cardstock. I also cut the image out on white card stock using the shadow/blackout feature. I trimmed around the black cut-out to use as the base of the card. This cut looks like a stencil. Then I glued it onto the front of a white card. I adhered the sailboat pieces onto the white shadow/blackout cuts. Then adhered the pieces into the stencil. To finish the card I adhered ribbon under the sailboat. Rounded the corners of the card. Used a white gel pen to do faux stiching around the edge of the card. Cut a small piece of black card and stamped 'happy birthday' from Lizzie anne designs Little Bits rubber stamp set using Versa Color 80 White.


Saturday, September 25, 2010


Bo Bunny Scrapbook Kit
I purchased this kit from Arnolds Scrapbook store at Rothwell. I've made the front cover to suit the photos I want to put into this album. The difference is the title which I created using Print Shop 22. I've printed the title on overhead projector transparency film using an inkjet printer. Then used split pins to attach the title to a piece of card stock. I used Pritt Gel glue to adhere the title to the Acrylic Front Cover.


Friday, July 16, 2010

Card challenge using Copic Markers


'Thinking of You' created by Susan
Copic markers used to make this card YR 04, YR 09 (flowers), YG 03, YG 13, YG 67 (leaves)
Background behind the flower image was created using the Copic air brush.
Martha Stewart border punch 'Arch Lattice' was used to create the decorative borders.


'Just Because' created by Kay

Copic Markers used to make this card V 04, V 15, V 17 and YG 63
X cut punch by Docrafts was used to create the decorative borders for this card.

'For a Friend' created by Jenny

Copic Markers used to create this card RV 06, RV 21, RV 29, RV 42- flower, G 02, G 99- leaves
Copic air brush was used to create the background behind the image.
EK success edger punch 'Open Scallop' to create the decorative borders.
A special Thank You to my sister for arranging this card challenge. The image on the cards is a digital image 'Mum's Blossoms' and is available as a free printable from Beccy's Place www.beccysplace.blogspot.com
Thank You Beccy for this wonderful image.


Saturday, June 26, 2010

Page 1

Page 2
You're a Hoot
Items used to create this 2 page layout
Cricut Create
Cricut Cartridges- Straight from the Nest & Create a Critter
Cuttlebug by Provo Craft Embossing folder Swiss Dots & Forest Branches (Tree & branch)
DCWV-The Green Stack (base for the layout)
Bazill card was used to create all the cute critters, sun, tree, branch, words and photo mats.
Copic Markers B14, B21, B24 & Copic airbrush (So Cute & Say Cheese)
Krafty Lady-cloud stencil & Versa Color white, sky gray and sky blue were used to create the clouds on the blue mat.

The photos on these layouts are of my youngest son on his 3rd birthday back in 1994.


My very first Scrapbook Pages
Back in 2003 I began to scrapbook. These are my very first 3 pages. The photos are of my family the day we visited the Currumbin Wildlife Sanctuary on the Gold Coast. This was one of our favourite places to visit during our holidays.


Thank You (Easel card)


Items used to make this card:
Stampavie-Puppy Love stamp by Sarah Kay
Copic markers and the Copic airbrush
ek success edger punch-open scallop, Cricut Create, Cricut cartridges- Cindy Loo for the swirls, Mini Monograms for the scallop tag.
Cardstock- Prima 'Watercolor Rainbow Collection', Card base - white card
Prima Flowers, button split pins, Kindy Glitz, Glue Glider Pro and Pritt gel
The flowers, swirls and the ribbon were coloured using the Copic airbrush.
The stamp image was coloured using the Copic Markers and I put a mask over the image before airbushing the background.
The yellow check card was edged using the edger by Ek success. I used Kindy Glitz on the swirls.


Sunday, May 16, 2010


The stamped image on this card is by Tina Wenke. You can check out her stamps at www.tinawenke.com This stamp was purchased at Arnolds Scrapbooking at Rothwell Qld.
Copic Markers were used to colour the image. I inked around the edge of the stamped image using Vera Color 55 Umber. The blue cardstock was embossed using the Cuttlebug embossing folder 'Jamara'.

The image on this card was purchased from www.digitalpenciltoo.blogspot.com Great site worth checking out for digital stamps. I coloured the stamp using Copic markers. I inked around the edge of the card with the stamp using Vera Color 55 Umber. The Happy Birthday was made using the Cricut cartridge "Just Because" Cards. Page 45 in the handbook. This was cut out using white card stock. The edge was inked using Vera Color 136 Baby Blue. Other elements used ribbon, flowers and split pin.

Monday, May 3, 2010

I created this scrapbook page during a Tinkerbell challenge scrapbook day. I gave this page to my sister for her to put into her granddaughters scrapbook album. To create the Tinkerbells, the flower and the mushrooms I used the Cricut Tinkerbell cartridge. The tree was created using the Cricut My Community cartridge. The base paper was from DCWV Once Upon a Time Stack.
This card was made for Mothers Day. I used the Cricut Paisley Cachemire cartridge Card/Tab feature on page 27 of the handbook. The butterfly was cut using the Sentimentals cartridge Page 46 in the handbook. The paper I used to make the card is from DCWV Nursery paper stack.


To create the card I used the Cricut cartridge
Once Upon a Princess.
Page 26 in the handbook (doll).
Page 28 for the cloths.
Page 44 Castle.
For the tree I used My Community.
Page 37 in the handbook.
I made the crown for the gift bag using
the Cricut Sweet Treats cartridge.
Page 45 in the handbook.
Heart shape jewels on the crown I purchased at Spotlight.