Showing posts with label birthday card. Show all posts

Sunday, May 20, 2012

Birthday Card

To make this card
Card Base - core cards Pastels Card A2
Floral Mat - DCWV The Painted Petals Stack
cut @ 51/4 x 4 inches
Happy Birthday-Making Memories Slice words & expressions design card
happy cut @ 2 birthday cut @ 2.5
Butterfly-Making Memories Slice Applique Basics design card
Butterly cut @ 3 inches- embellished with Yellow Stickles
The butterfly was adhered to the card with pop dots.I cut out three of the flowers from the sheet of paper from the Painted Petals Stack and adhered those also to the card base using pop dots. These flowers are the small flower to the right, the large purple flower to the left and the purple flower above the butterfly. For the inside of the card I stamped the sentiment 'May your day be special' This stamp is from Stamp-It self cling rubber stamps. To stamp the sentiment I used Stampin up Vintage Violet.

Saturday, April 14, 2012

Look what I've been up to

Smash Book entry- Christmas card & Postcard from my sister in Holland.


Journal book I made using Kaisercraft Shaken Not Stirred Collection


Birthday card


Sunday, November 6, 2011


Cricut Art Philosophy Close to my Heart

For the base of the card I used Bazzill card and Kaisercraft Vintage Timeless 6.5" paper pad. I used the card cutout from page 36 in the handbook. I also cut out the shape and the layer. The stamped image used comes with the Art Philosophy cartridge. I used Memento Rich Cocoa to stamp the image. After I had assembled the base cutouts and had adhered the stamped sentiment I cut out a piece of Bazzill card rounded the corners and adhered this behind inside the card to give a finished look. The swirl is from page 58 in the handbook. These were cut also as a mirror image. I cut each swirl out four times and adhered them together to give a faux chipboard effect. The pattern paper for the swirl from Vintage Timeless. The small flowers are punched out using a Stampin Up punch Three for you. For the centre of these flowers I used Kaisercraft Droplets. For the roses I used the cutout on page 68 of the Arts Philosophy handbook. I cut the large flower @ 2.5 and the smaller flowers @ 2. For the centre of the roses I used liquid pearl as a fill and when that dried I placed a pink pearl on top of each flower. To create the leaves I used the cutout on page 28 of the handbook. These were folded, inked and I painted them with paper tole gloss. The raffia element was also painted with the gloss. To finish off the card I painted each flower with Smooch Pearlized Accent Ink and Pearlized Top Coat.

Tuesday, September 20, 2011

Birthday Card


Lori's Garden
Fancy Frames
Flower Shoppe
Plantin SchoolBook

Card base Bazzill White card 5 1/8 square. To make the mats for the base of the card I used the print pattern on page 35, the floral print on page 43 and the bird cage print on page 35 from Lori's Garden. The print pattern is 5 1/8 square. The bird cage print is 4 7/8 square and the floral print is 4 1/2 inch square. These mats were adhered flat onto the card base. On top of these mats I adhered a 10cm lace doilie.
The pink strip was printed from the Imagine using the color palette from Lori's Garden. I used a 6 x 6 inch square of the print pattern and edged it with Martha Stewart Punch around the Page Swirling Lace punch and cut this to fit onto the pink strip. On top of this element I adhered sheer ribbon. This element was adhered flat onto the card base.
From the Fancy Frames cartridge I cut frame 12 and used the color palette from Lori's Garden. The frame was printed and cut at 3". One was cut using brown for a shadow and one in pink for the top layer. For the centre of the frame I cut out an oval using the print paper that was left over from creating the lace border. The frame was adhered flat onto the card. I used Plantin Schoolbook to create the number 70.
I created the flower using the cut on page 14 of the Flower Shoppe handbook Heart 2. I cut two flowers @ 2 inches two flowers @ 1.5 inches and two flowers @ 1 inch. I used the floral print for the 2 inch and 1 1/2 inch flowers. For the inch flower I used the pink from the Lori's Garden colour palette. I curled each petal using my fingers. I glued each flower layer together and for the centre of the flower I used a pearl. Before adhering the flower onto the card I looped three pieces of sheer ribbon and attached these onto the card using glue dots. I adhered the flower using pop dots. The Happy Birthday element is from Lori's Garden and was printed and cut @ 1.5 inches. I adhered this element to the card using pop dots. To finish off the front of the card I adhered a bow onto the frame and put 3 pearls onto the border element. Inside of the card I adhered a 4 3/4 inch square pink card and glued a butterfly that was printed and cut @ 1 inch. This butterfly is on page 12 of the Lori's Garden handbook.

Saturday, August 27, 2011

Birthday Card


Imagine More
Birthday Bash

Card- Hero Hues (Hero Arts) A2 Folded Cards- Latte (outside) white (inside). To the card I adhered brown card leaving a small border of the Latte colour. Using the Imagine I printed and cut the pattern on page 41 of the handbook using the 5:7 rectangle @ 4. I trimmed the length then adhered this to the brown card leaving a small border. For the embellishments I printed and cut the Icons on page 31 of the Imagine More handbook. I printed and cut the Attention Icon @ 3 twice. One for the outside of the card and one for the inside. Take Note was printed and cut @ 3. This was adhered flat onto the card. From the Birthday Bash cartridge I printed the phrase on page 40 of the handbook It's your Day @ 2.3 using the same pattern from the Imagine More cartridge that I used for the base of the card. For the Happy Birthday I used Print Shop 22 the font is "Scroll" @ 28pt. I inked around the edges using Versa Color 55 Umber. I adhered this onto a piece of the brown card. To adhere the Attention icon and the Happy Birthday to the front of the card I used pop dots. For the inside of the card I used the same base as for the front. I adhered the Attention icon flat to the inside. The speech bubble which is on page 33 of the Imagine More handbook was printed and cut @ 2.8 and adhered flat. I used the speech bubble to write a special birthday message.

Birthday Card

Imagine More Cards

For the base of this card I used a pink card (105 x 150mm) from the Paper Xtra Card Kit. Using the Cricut Imagine I selected the 5x7 rectangle. The pattern for the base layer is on page 40 of the handbook. I printed this @ 5 and trimmed it to fit the card. This was adhered flat to the card base. For the scallop rectangle I selected the pattern on page 41 of the handbook. This was printed and cut @ 3.5. This was adhered flat on the pattern layer. I used the layered image on page 9 of the handbook these layers were printed and cut @ 3. The first two pieces were adhered together and then adhered flat onto the scallop rectangle. The happy bird-day and the bird were adhered onto the card using pop dots. I used white flowers. The larger flower was coloured with a Copic marker Baby Blue B21 using the air brush. I used a baby blue split pin to hold the flowers together. The flowers were adhered flat onto the card.To finish off the card I adhered a scallop rectangle and a bird inside. It was printed and cut using the same sizes as for the front of the card.


Saturday, July 23, 2011


Cricut Imagine Bubblegum Stripes
Nifty Fifties
Elegant Edges

To make the card base I used the rectangle 5:7 on the Imagine. This was printed using the pattern on page 3 of the handbook and cut @ 5. The circle pattern page 2 handbook was printed and cut @ 4.8 square and trimmed to size 3inch x 4 11/16 inch. The orange mat is core'dinations ColorCore Cardstock. The green note shape (imagine shape) was printed and cut @ 2 using the color palette (Bubblegum Stripes) also using the same color palette I printed and cut the orange note shape @ 1.8. The Happy Birthday sentiment was printed onto the orange note shape with my printer. I used Photo Shop 22 the font is 'Bliss' this was printed @ 24 pts. To make the border I used Elegant Edges and the same colors as the note shapes. This pattern can be found on page 34 in the handbook. The border and shadow was printed and cut @ 1 and trimmed at either end to fit the card. To finish the border I used a matching lime green ribbon along the top. The car is from the Nifty Fifties cartridge. This cutout can be found on page 24 of the handbook. The car was printed and cut @ 1.2. The color for the car is from the color palette (Bubblegum Stripes) except for the blue. For the blue I used RGB code R147 G200 B198. I used pop dots to adhere the Happy Birthday sentiment and the car onto the card. To finish off the card I printed and cut a 5:7 rectangle (Imagine shape) @ 4.9. using the lime green from the color palette and adhered this to the inside of the card.

Friday, June 24, 2011


First Project using the stamp I made with the Teresa Collins Stampmaker.

To make this card I used the following items

Craft Concepts embossing folder-Budding vine

Sizzix eclips & the Sizzix eclips Cards & Envelope cartridge

Cricut Imagine & Cricut Calligraphy Collection cartridge

Spellbinders Nestabilities Labels twelve cut & emboss

Copic markers & Copic airbrush

Perfect Pearls-101

Stickles-Icicle

Core'dinations (Whitewash) Color Core Card stock

Bazzill card

String small white beads & flower lace

Using the Sizzix eclips I cut the card base page 76 (handbook) @ 4.75 x 4.75 using Bazzill card. From the Core'dinations card I cut a square using the same measurement to layer ontop of the base card. The embossed square measures 4 1/2 x 4 1/2 inches. The square with the beads attached measures 3 1/2 x 3 1/2 inches. This square was adhered to the card using pop dots. The beads were adhered to the card using Pritt Gel glue. The stamped image was cut out and embossed using the Spellbinders Nestabilities label twelve. This was adhered flat to a square 3 x 3 inches of the Core'dinations (whitewash) card. I used a Creative memories corner punch to give each corner a decorative edge and used Perfect Pearls 101 in each of the corners. This square was adhered to the 3 1/2 inch square with the bead using pop dots. The flower lace was adhered to the card using the Pritt glue. The flourish was printed and cut @ .8 on the Cricut Imagine RGB code 239 239 239 (Bazzill Diamond) three times then glued together for a faux chipboard effect. The flourish was coated using stickles Icicle. To finish off the card I cut five threads of the beads 2 longer, 2 short equal lengths and one short length and glued them to look like a bow then adhered the flower on top using the Pritt glue. The flower was handmade using an eight petal flower cut out.

Thursday, June 9, 2011


Blossom Cricut Imagine
Elegant Edges
Heritage
Card Base- White Bazzill card 10 x 5 inches
Scored @ 5 inches and folded.

I printed and cut the pattern from page 6 Blossom (handbook) @ 4.8 x 3. One for the front of the card and another for the inside (right). For the inside (left) pattern I used the flip horizontal feature before printing for a mirror image effect. The pink daisy scallop border on the centre front of the card I used Bazzill pink card and the punch I used is from Fiskars. To create the Cameo embellishment I used the color palette from the Blossom Imagine cartridge. To create the base I printed and cut the Shadow feature page 65 Elegant Edges (handbook) @ 3.2. I also printed and cut the Oblong feature @ 3.2 using the pattern on page 8 (handbook). These two cutouts were adhered together flat. The cameo page 65 Heritage (handbook) was printed and cut @ 2.5. These two cutouts were also adhered together flat. I used pop dots to adhere the cameo onto the scallop base. I edged the frame of the cameo with Stickles Icicle and for the silhouette I coated it with Dimensional Magic. The complete cameo embellishment was adhered to the card with pop dots. The bow was tied to the strip of ribbon along the scallop border. To hold the tails of the bow in place I used Pritt Gel glue. To finish off the card I stamped Happy Birthday (Crafty Bitz) using Memento Rich Cocoa. For the inside of the card I created a journal block using the shadow and oblong feature from page 65 Elegant Edges (handbook). Shadow was printed and cut @ 3.3 the pink scallop was printed and cut @ 3.2. I used Color Box Creamy brown to edge the pattern card and the scallop cuts.

Monday, May 30, 2011


Happy Birthday Easel Card

KATE'S KITCHEN

Cricut Imagine

Card Base 12 x 6 inches scored @ 6 inch & 9 inch & one 6x6 square card

For the base of the card I used Bazzill card.

For the patterned layer on the base of the card I used the first pattern on page 43 (handbook). This was printed and cut @ 6 three times. I used the base layer image on page 19 (handbook) for the front of the card. This was printed and cut @ 5.2.

All other images

Recipe Box page 11 (handbook) printed & cut @ 2.

Cupcakes page page 19 (handbook) printed & cut @ 3 & 1.

For the 3inch cupcakes I also printed the icing/frosting layer.

The sentiment 'I was made just for you' page 19 printed & cut @ 4.

Bowl page 10 (handbook) printed & cut @ 1.5.

Rolling pin printed & cut @ 2.

Utensils page 11 (handbook) printed & cut @ 3.5 (combined image)

I also printed & cut the layer image utensils only.

Spoon page 12 (handbook) printed & cut @ 3.

Cook book page 12 (handbook) printed & cut twice @ 2.

Using scissors I cut around the front cover on one of these images inked around the edges using Versa color 55 Umber and used pop dots to adhere this to the other image for a layered effect.

Recipe Card page 26 (handbook) printed & cut @ 1.8

I adhered flat onto the recipe card a cupcake over the cherry print. Then I adhered the card onto the same color Bazzill card I used for the card base and cut around leaving a small border.

All the cut images I inked around the edges using Vera Color 55 Umber. Pop dots were used to adhere the Sentiment, the utensils, bowl, the small cupcake and the icing/frosting to the front of the card. For the inside of the card I cut a 6x2 inch piece of the pattern paper and adhered this to a 6 x 2 1/4 inch Bazzill card. To this I used pop dots to adhere the Cook book. The recipe card was adhered flat. This card was adhered to the inside of the card using pop dots. To finish off the card I used ribbon, 3 red buttons and brown string. I used My Pink Stamper 'Sweetest Cupcakes' stamp for the Happy Birthday on the front of the card.

Sunday, May 15, 2011


Cricut Imagine Buccaneer

Easel Card

Base for the card same as in my previous post. For the front of the card the pirate was printed and cut using the layer feature @ 4.8. The word "Arrrrrgh" was printed and cut @ 1.5. The bird was printed and cut using the layer feature @ 1.5. For the red stripe paper I printed a full sheet pattern page 35 (handbook). This was cut to 5 1/2 x 5 1/2. I also cut a piece of Core'dinations burnt orange card @ 4 1/2 x 5 3/4. For the inside of the card the Happy Birthday Matey was printed and cut @ 2.5. To make the decorate element for the card base I printed a full sheet of the pattern on page 39 (handbook). This was cut @ 5 inches then using scissors I cut around the bottom of the wave leaving a small amount of the black print as an edge. On top of that cut I adhered a small strip of the red stripe card 5 1/2 x 1/2 inch. I did this by using sticky tape at the back of the cuts to secure them to each other. I also adhered a small piece of the burnt orange to the left side using sticky tape. Then this element was adhered to black card leaving a narrow border at the top then once again cutting around the wave leaving a small edge (shadow). To assemble the inside base of the card I adhered a piece of the red stripe card which measured 5 11/16 x 5 13/16. Then I adhered a piece of the burnt orange card which measured 5 3/4 x 4 1/2 one inch from the top of the red stripe card. On top of the burnt orange card I adhered the decorate element using pop dots. I used pop dots to adhere the Happy Birthday Matey to the card. I used a thin strip of the red stripe card to create the checker effect at the base of the card. For the front of the card I adhered the burnt orange card on to the black card then I adhered the red stripe card. The layers for the pirate was adhered using pop dots. The assembled pirate was adhered to the card using pop dots. The layers for the bird was glued flat except for the top layer (birds face) I used a small pop dot and also a small pop dot for the buckle. I used pop dots to adhere the bird to the card.


Cricut Imagine Buccaneer

Easel Card

For the base of the Easel card I cut a piece of black card 12 x 6. I scored the card at 6" and 9". I cut a piece of black card 6 x 6 for the front of the card. I printed a full sheet of the red stripe card pattern page 35 (handbook). This was cut at 5 7/8 inch square and adhered on to the inside base of the card.

The pirate page 6 (handbook) was printed and cut using the layer feature @ 4.5. The wheel page 17 (handbook) was printed and cut using the layer feature @ 2.5. The keg/barrel page 20 (handbook) was printed and cut using the layer feature @ 1.8. The treasure chest page page 18 (handbook) was printed and cut using the layer feature @ 2. The wooden planks page 26 (handbook) was printed and cut @ 3.3. The bottles page 33 (handbook) was printed and cut @ 1.3. Shivers me Timbers page 24 (handbook) was printed and cut @ 1.3. Happy Birthday Matey was printed and cut @ 2.5 page 25 (handbook).

To assemble the card a wooden plank was adhered flat on the front of the card. The wooden plank on the inside of the card was adhered using pop dots. Happy Birthday Matey and the bottle on the inside of the card was also adhered using pop dots. The wheel was assemble using pop dots for the layers. The assembled wheel was adhered flat on the card. The pirate was assembled using pop dots for the layers. The assembled pirate was adhered to the card using pop dots except for his hand behind the treasure chest it was glued flat on to the wooden plank. The treasure chest was assembled using pop dots. It was adhered to the card using pop dots. For the keg/barrel the layers were glued flat. I cut off the burning wick and adhered the skull. The skull is from the pirate flag page 21 (handbook). For the bottle near the treasure chest I adhered it flat onto the card the other bottle was adhered using pop dots.


Elegant Edges & Country Life

Cricut Imagine


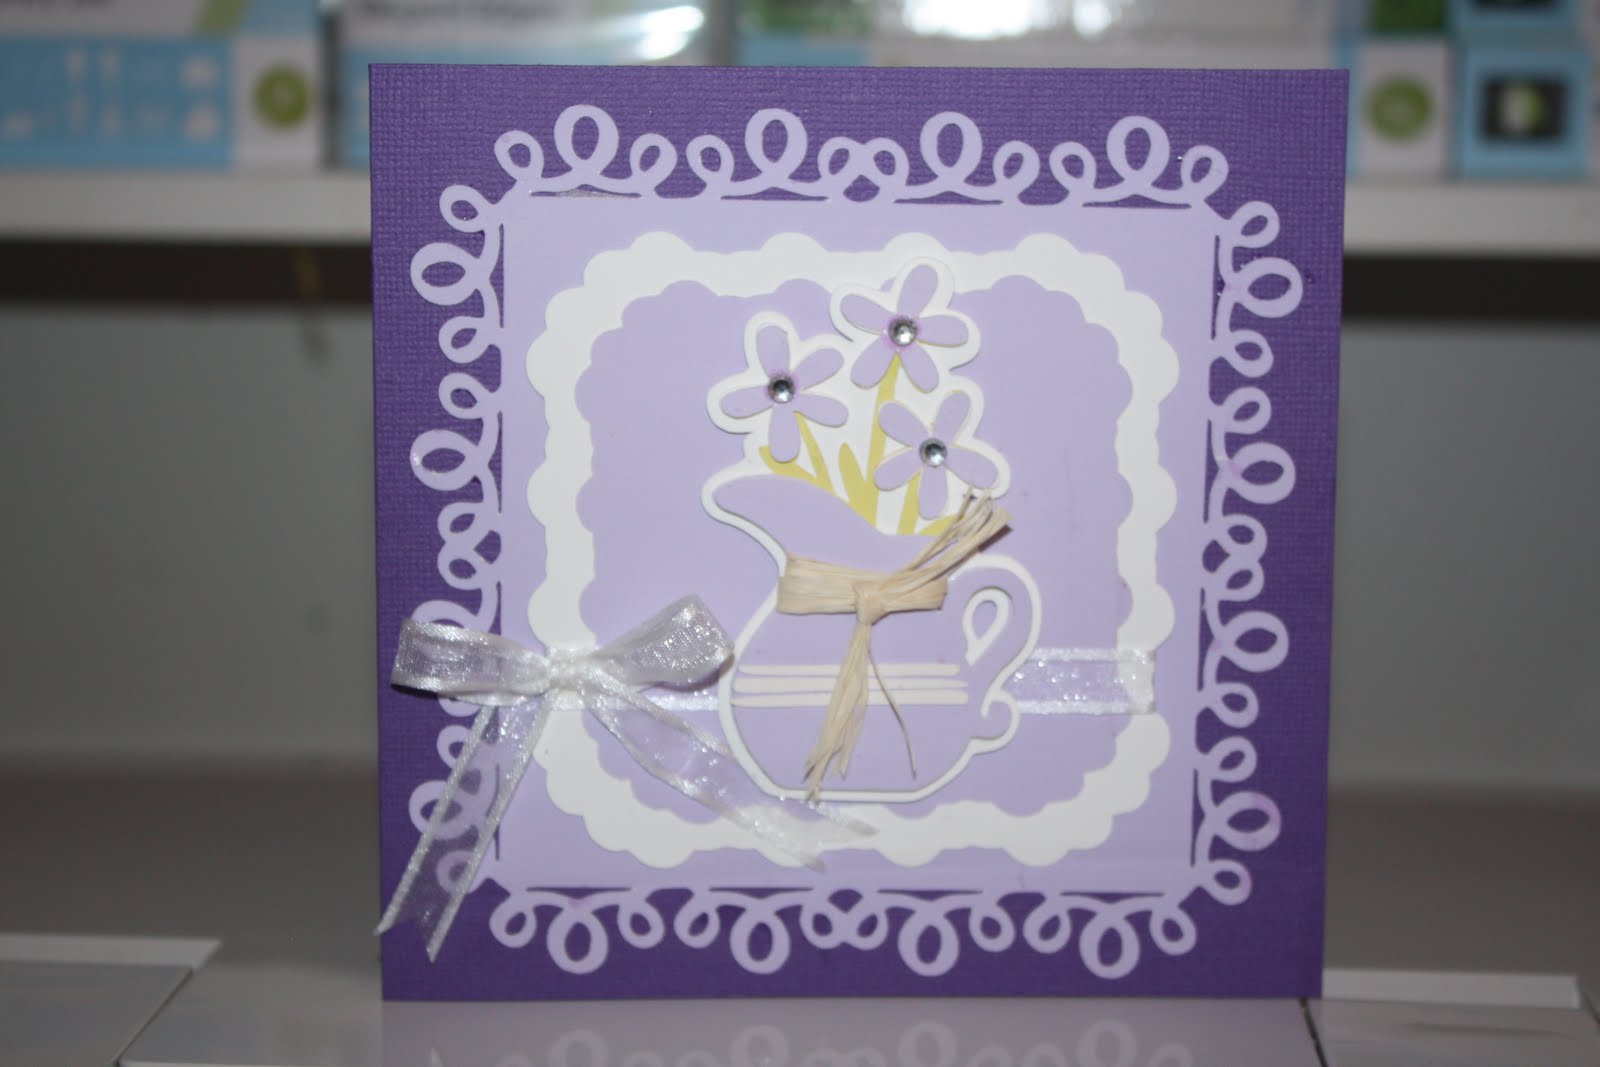
To make this card I used the project on page 9 (handbook) Elegant Edges but I made each cut smaller so they would fit onto a card. Base card- Bazzill Purple card 5 3/8 x 5 3/8. I used Epson PremierArt 12 x 12 Scrapbook Photo paper for the Imagine print and cuts. Using the Imagine I used RGB: 176 153 201 Frosted Amethyst to print and cut the Loops mat @ 5 page 35 Elegant Edges (hand book) and the smaller shadow mat printed and cut @ 3. The white shadow mat was cut @ 3.5. The pitcher was printed and cut twice @ 3 page 60 Country Life (handbook) using the same RGB code. I also printed a green pitcher for the flower stems. I printed Layer 1 & Layer 2 twice. Once using an off white colour and once using the Frosted Amethyst RGB code. The shadow was cut using white card. To assemble the jug I adhered the green pitcher onto the white shadow. Then I adhered one of the Frosted Amethyst pitcher onto the green pitcher. I adhered the off white flower on top of the green flower and finally adhered the Frosted Amethyst flowers on top. Faux chipboard effect. I added a clear Kaisercraft Rhinestones to the centre of each flower. For the pitcher on top I wrapped a small piece of raffia around adhered on the off white pieces from Layer 1 & 2 then adhered it on top using pop dots. I also used pop dots to adhere the assembled pitcher onto the card. The bow was adhered to the card using Pritt Gel glue. To finish off the card I printed and cut a square @ 5 using the Frosted Amethyst RGB with the imagine. Then I created a sentiment using Print Shop 22. The sentiment reads Wishing you a very Happy Birthday. I printed the sentiment onto the Frosted Amethyst square using my printer. This was adhered to the inside of the card.

Monday, May 2, 2011


Cricut Imagine Lori's Garden


Cricut Cake Holiday Cakes


Plantin Schoolbook


Mothers Day Card, envelope and gift


The envelope

To create the envelope I printed a doubled sided 12x12 sheet of card using the pattern on page 43 of the handbook and the yellow floral pattern on page 44 of the handbook. For the envelope cut I used Plantin Schoolbook Cricut cartridge in the Cricut Imagine and used the cut only feature. This envelope is on page 79 of the handbook (Plantin Schoolbook). I also used the fit to page feature which cut the appropriate sized envelope for the card.


The card

For the base of the card and the smaller pink mat I used Color Mates Deep Fairy Tale Pink card. The base card measure 6" x 4 3/8". Floral print on top of the base card same as the pattern I used for the envelope. Small pink mat was cut @ 5 1/4x 4". Yellow floral print on top of this mat same as the print for the envelope. To make the pink lace scallop I used Martha Stewart Lace border punch. Ribbon was adhered along the lace border and a small piece of ribbon was knotted around. I used the image on page 22 handbook (Lori's Garden) for the top layer. This was printed and cut @ 4. using the layer feature. The sentiment Happy Mothers Day is from the Holiday Cakes cartridge page 70 (handbook). I printed this directly on to the yellow floral print paper using the print only feature on the Imagine. For the inside of the card I printed and cut 2 of the floral mats and one of the yellow floral mats. I printed a sentiment on to the yellow floral mat using Print Shop 22 and my printer. I printed and cut the rose on page 8 of the handbook (Lori's Garden) using the layer feature @ 1.5 and adhered this on the inside bottom right hand corner.


The Gift

To create the box for the gift I printed a full sheet of the floral print page 43 Lori's Garden handbook. This was cut to measure 10" x 8". I scored the card to help fold it to create the box. I wrapped it around the gift then I adhered it together with strong tacky tape. To create the fold at the top and bottom of the box I cut along each corner and folded each flap in then used the tacky tape to adhere each end down. To embellish the box I used one strip of pink and white card stock and edged both with the Martha Stewart Lace border punch. I scored these strips to wrap around the box. I adhered on the ribbon and tied a small piece of ribbon. The rose was printed and cut @ 1.8 using the layer feature and was adhered using pop dots.

Friday, March 25, 2011


Image More Cards
&
Birthday Bash

To create the base for the card I used the card feature on
page 38 Birthday Bash handbook. I printed and cut the base
on the Cricut Imagine @ 5 inches. The pattern on the card
base was from Imagine More Cards cartridge page 41 handbook.
Using the Birthday Bash cartridge I printed and cut the tag
page 39 handbook @ 5 inches. The pattern for the tag I used
the pattern on page 40 of the Imagine More Cards handbook.
The scallop was cut using the tag feature on
page 43 Birthday Bash handbook. Printed and cut @ 4.9 inches.
To make the cake I used the Imagine More Cards image on
page 2 in the handbook. I printed and cut the cake @ 3 inches
using the layer feature. I assembled the cake using pop dots.
The Happy Birthday was cut from the Image More Cards
cartridge. I used the image on page 10 in the handbook.
I used the layer feature and printed & cut only the layer
Happy Birthday Chick @ 3.5 inches. I used pop dots to adhere
the sentiment Happy Birthday to the card.
To embelish the card I used thin green and pink ribbon.


Sunday, January 2, 2011


Cricut Imagine Ancestry Colors & Patterns & Cricut Heritage
.....
Car - Heritage cartridge page 62 handbook
Printed and cut on the Imagine
Pattern for the car page 7 handbook Ancestry Cricut Imagine
I inked around the edges using Versa Color 55 Umber
.....
Card base Bazzill card
.....
Patterned card Cricut Imagine Ancestry
pages 10 & 11 handbook
.....
E K success open scallop edger punch
.....
Happy Birthday - Little Bits rubber stamp set - Lizzie anne designs
.....
Other items 3 brown split pins, 2 brown flowers, brown string and a button.
.....


Friday, November 12, 2010


eCraft
Jen Allyson Designs
Birthday Card
Card Base 4 1/8 x 5 7/8 inch
Front and Back cover DCWV Green Stack 4 x 5 3/4 inch each
Bird- Category 6 Image 13, 14 and 15 cut a 3 inch
Branch - Category 5 Image 45, 46 & 47 cut @ 3 inch
Frame- Category 2 Image 11 cut @ 3 1/2 inch
EK success edger punch Musical Symphony (music notes)
I used Print Shop 22 to create and print the
sentiment on the frame.
I used Vera Color 55 Umber to ink around
the frame,bird and leaves.
........................
How to Print Sentiment onto the Frame using a printer
....
Create your Sentiment using a word document programme
or in this case I used Print Shop 22.
Measure the required size to fit the frame.
For this card I used
2 1/2 inch W x 2 inch D text box.
I typed the sentiment then printed it onto an A4 sheet of paper.
Adhere the frame over the printed words. ( I used low tac double
sided tape for this process so it is easy to remove the frame from the A4 sheet.)
Use a light box or other light source to check the alignment
of the print before placing theA4 sheet back into the printer.
Once you are happy with the alignment place the A 4
sheet of paper back into the printer and click print.
Remove the frame from the sheet of paper.
This process can be used to print words or sentiments on any
size or shape of card you require by adjusting the print size as required.
...............................................