Showing posts with label cricut imagine. Show all posts

Thursday, June 9, 2011


Blossom Cricut Imagine
Elegant Edges
Heritage
Card Base- White Bazzill card 10 x 5 inches
Scored @ 5 inches and folded.

I printed and cut the pattern from page 6 Blossom (handbook) @ 4.8 x 3. One for the front of the card and another for the inside (right). For the inside (left) pattern I used the flip horizontal feature before printing for a mirror image effect. The pink daisy scallop border on the centre front of the card I used Bazzill pink card and the punch I used is from Fiskars. To create the Cameo embellishment I used the color palette from the Blossom Imagine cartridge. To create the base I printed and cut the Shadow feature page 65 Elegant Edges (handbook) @ 3.2. I also printed and cut the Oblong feature @ 3.2 using the pattern on page 8 (handbook). These two cutouts were adhered together flat. The cameo page 65 Heritage (handbook) was printed and cut @ 2.5. These two cutouts were also adhered together flat. I used pop dots to adhere the cameo onto the scallop base. I edged the frame of the cameo with Stickles Icicle and for the silhouette I coated it with Dimensional Magic. The complete cameo embellishment was adhered to the card with pop dots. The bow was tied to the strip of ribbon along the scallop border. To hold the tails of the bow in place I used Pritt Gel glue. To finish off the card I stamped Happy Birthday (Crafty Bitz) using Memento Rich Cocoa. For the inside of the card I created a journal block using the shadow and oblong feature from page 65 Elegant Edges (handbook). Shadow was printed and cut @ 3.3 the pink scallop was printed and cut @ 3.2. I used Color Box Creamy brown to edge the pattern card and the scallop cuts.

Sunday, May 15, 2011


Cricut Imagine Buccaneer

Easel Card

For the base of the Easel card I cut a piece of black card 12 x 6. I scored the card at 6" and 9". I cut a piece of black card 6 x 6 for the front of the card. I printed a full sheet of the red stripe card pattern page 35 (handbook). This was cut at 5 7/8 inch square and adhered on to the inside base of the card.

The pirate page 6 (handbook) was printed and cut using the layer feature @ 4.5. The wheel page 17 (handbook) was printed and cut using the layer feature @ 2.5. The keg/barrel page 20 (handbook) was printed and cut using the layer feature @ 1.8. The treasure chest page page 18 (handbook) was printed and cut using the layer feature @ 2. The wooden planks page 26 (handbook) was printed and cut @ 3.3. The bottles page 33 (handbook) was printed and cut @ 1.3. Shivers me Timbers page 24 (handbook) was printed and cut @ 1.3. Happy Birthday Matey was printed and cut @ 2.5 page 25 (handbook).

To assemble the card a wooden plank was adhered flat on the front of the card. The wooden plank on the inside of the card was adhered using pop dots. Happy Birthday Matey and the bottle on the inside of the card was also adhered using pop dots. The wheel was assemble using pop dots for the layers. The assembled wheel was adhered flat on the card. The pirate was assembled using pop dots for the layers. The assembled pirate was adhered to the card using pop dots except for his hand behind the treasure chest it was glued flat on to the wooden plank. The treasure chest was assembled using pop dots. It was adhered to the card using pop dots. For the keg/barrel the layers were glued flat. I cut off the burning wick and adhered the skull. The skull is from the pirate flag page 21 (handbook). For the bottle near the treasure chest I adhered it flat onto the card the other bottle was adhered using pop dots.


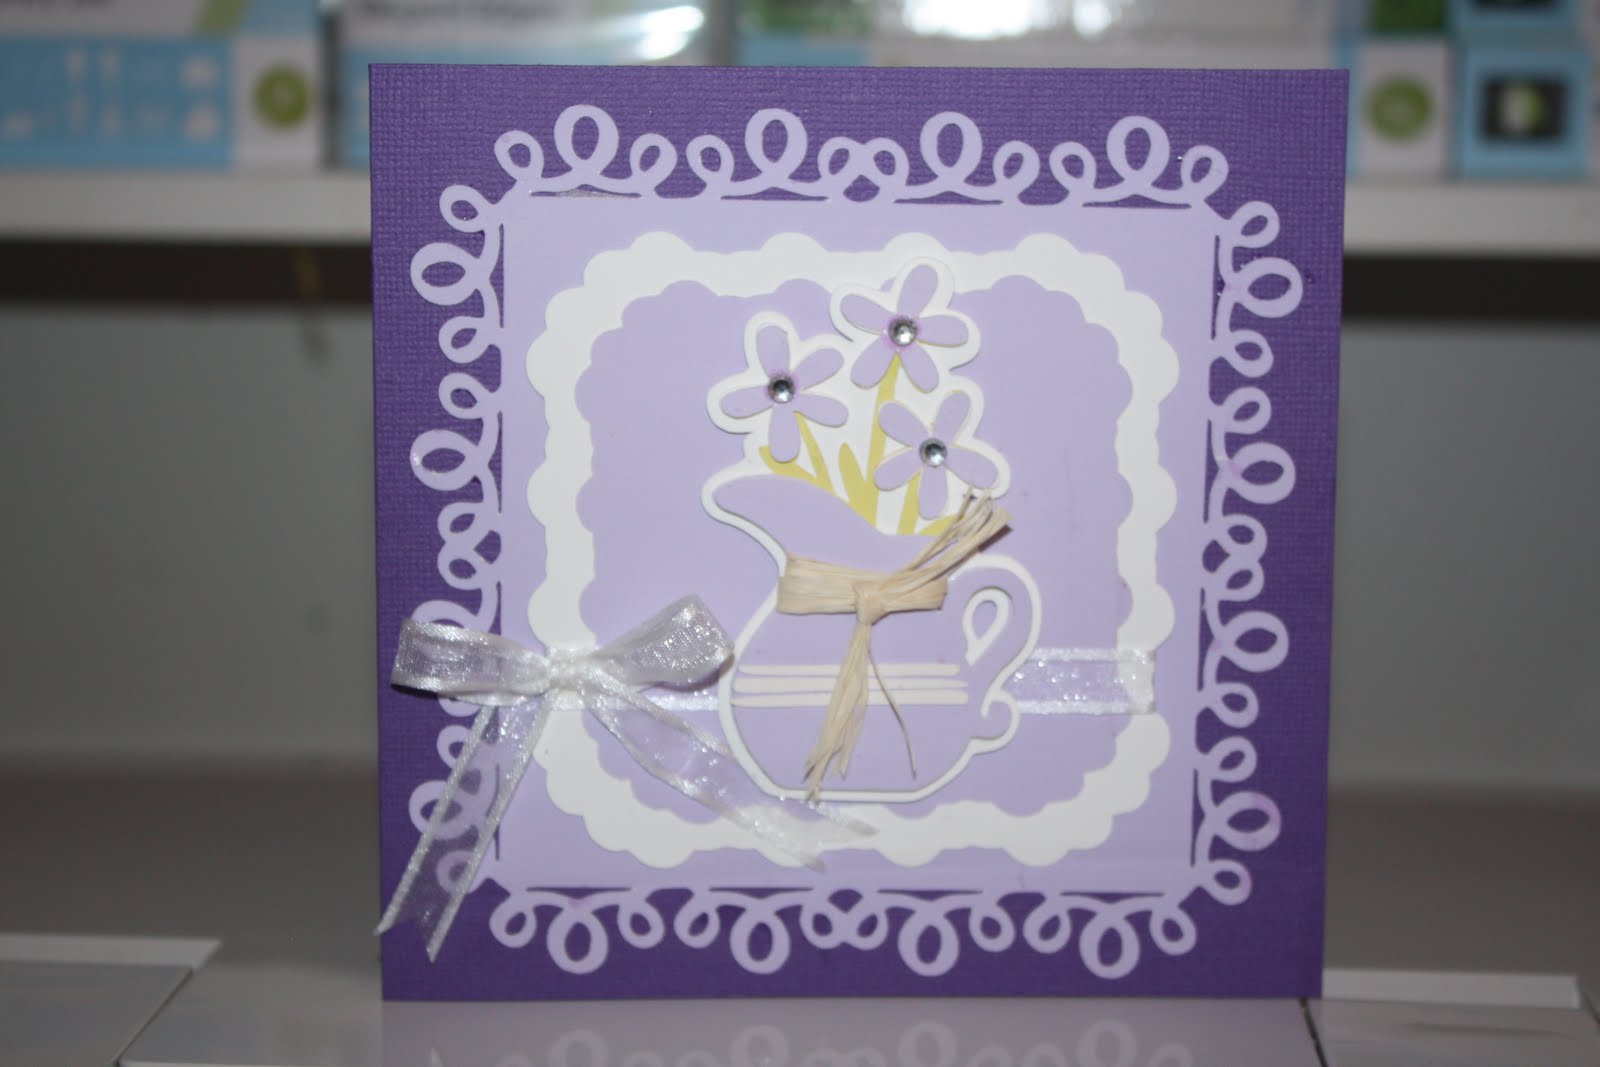
Elegant Edges & Country Life

Cricut Imagine


To make this card I used the project on page 9 (handbook) Elegant Edges but I made each cut smaller so they would fit onto a card. Base card- Bazzill Purple card 5 3/8 x 5 3/8. I used Epson PremierArt 12 x 12 Scrapbook Photo paper for the Imagine print and cuts. Using the Imagine I used RGB: 176 153 201 Frosted Amethyst to print and cut the Loops mat @ 5 page 35 Elegant Edges (hand book) and the smaller shadow mat printed and cut @ 3. The white shadow mat was cut @ 3.5. The pitcher was printed and cut twice @ 3 page 60 Country Life (handbook) using the same RGB code. I also printed a green pitcher for the flower stems. I printed Layer 1 & Layer 2 twice. Once using an off white colour and once using the Frosted Amethyst RGB code. The shadow was cut using white card. To assemble the jug I adhered the green pitcher onto the white shadow. Then I adhered one of the Frosted Amethyst pitcher onto the green pitcher. I adhered the off white flower on top of the green flower and finally adhered the Frosted Amethyst flowers on top. Faux chipboard effect. I added a clear Kaisercraft Rhinestones to the centre of each flower. For the pitcher on top I wrapped a small piece of raffia around adhered on the off white pieces from Layer 1 & 2 then adhered it on top using pop dots. I also used pop dots to adhere the assembled pitcher onto the card. The bow was adhered to the card using Pritt Gel glue. To finish off the card I printed and cut a square @ 5 using the Frosted Amethyst RGB with the imagine. Then I created a sentiment using Print Shop 22. The sentiment reads Wishing you a very Happy Birthday. I printed the sentiment onto the Frosted Amethyst square using my printer. This was adhered to the inside of the card.

Monday, April 25, 2011


Make A Wish

Birthday Card


To make this card I used the Cricut Imagine, Imagine Yummy cartridge, Birthday Bash and "Just Because" Cards.


"Just Because" Cards

From this cartridge I cut the card base and the scallop mat page 45 (handbook)


"Birthday Bash"

From this cartridge I cut the bird & balloon and the number three.


"Yummy"

From this cartridge I cut the birthday cake, the title "Make A Wish" as well as the pattern papers for on top of the base card, scallop mat. The pattern I used on top of the base card is the pink pattern on page 40 (handbook). The pattern for the top of the scallop mat is the first print on page 35 (handbook). The Color Palette from this cartridge was used for the base of the card, the scallop mat, the number three and for the bird.

The title "Make A Wish" was printed and cut @ 1 using the layer feature. I used pop dots to assemble this cut. Pop dots were used to adhere this cut onto the card. The number 3 was printed and cut @ 1.5 and was adhered flat onto the card. The bird was printed and cut @ 1.5. The pieces for the bird was adhered flat. I used pop dots under the bird and balloon to adhere it to the card. The cake was printed and cut @ 3 using the layer feature. I put the top of the cake/icing through the cuttlebug using the Swiss dots folder. I used pop dots to adhere this cut onto the cake. Pop dots were also used to adhere the candles except for the base of the candles which were adhered flat on top of the cake. All the other cuts were adhered flat to assemble the cake. The cake was adhered flat on the card. To finish off the card I rounded the corners. For the inside of the card I printed a sentiment using Print Shop 22 and printing it on the same pattern that was used on the card base.

Saturday, April 16, 2011


Mix and Match

using the Cricut Imagine


To make these Easter baskets I used Mymemories Scrapbook paper. This paper I purchased at Riot Arts and Crafts and is double sided with an adorable Easter theme print . I used the cut only feature on the Cricut Imagine to cut out the basket. This basket cut can be folded either way to whatever print you want inside or on the outside as shown in the photos posted above.

I used the print and cut feature on the Cricut Imagine to make the chicks and eggs. I used the Cricut Imagine Blossom cartridge and used the same cuts, color and size for the chicks and bow as mentioned in my previous post. For the eggs I selected four different coloured patterns from the Blossom cartridge to match the colours on the baskets ( blue, pink, yellow and green). I inked around the edges of the eggs with Vera Color 34 Orchid (pink egg), 187 Sage (green egg), 11 Canary (yellow egg) and 38 Sky Blue ( blue egg). As I will be giving these to young children I used a spot of Kindy Giltz on the chicks bow instead of a rhinestone. I also made a different handle for the basket. I used the end of the handle that had cut out with the basket as a template. I traced the end shape of that handle onto the ends of the handles that I wanted to use because there is a slit on the side of the basket where the end of the handle slips into. After I had traced the end shape I used scissors to cut the shape out. The making and the finishing touches for the basket are the same as in my previous post.


Friday, April 1, 2011

Imagine JT & Nifty Fifties

'Your cruisin' card


Card base 6 x 6 Bazzill cardstock (black)

Base mat JT imagine cartridge

Pattern page 42 handbook

Printed and cut @ 5.9

Inner mat (black) Bazzill card stock

cut @ 5 1/4 inch square

White mat cut @ 5 inch square and

edged - Martha Stewart Punch around the page 'Cracks'

The card title was printed and cut using the Imagine

and the JT color palette.

Phrase 'cruisin' page 46 Nifty Fifties handbook

I printed and cut the phrase 'get your kicks' page 38

handbook and used the word 'your' for the title.

For the car I used the Nifty Fifties cartridge

page 46 handbook. The car was printed and cut @ 2.5 inches.

I selected RGB code Red 225 Green 16 Blue 57 for the car body.

For the windscreen I used Red 199 Green 223 Blue 193.

I embossed the tyres using the Cuttlebug folder 'Mesh'.

The bumper for the car was printed and cut 4 times then adhered

together for 3D effect. I used the grey from the JT color palette for the bumper.

An Action Wobble was used to adhere the car to the card.

For the inside of the card I printed and cut a 5.9 square mat

using the same pattern selected for the front of the card.

I adhered a white mat cut @ 5 1/2 inch square

on top of the patterned mat. A place to write a personal message

to my son when he obtains his drivers licence.

Friday, March 25, 2011


Image More Cards
&
Birthday Bash

To create the base for the card I used the card feature on
page 38 Birthday Bash handbook. I printed and cut the base
on the Cricut Imagine @ 5 inches. The pattern on the card
base was from Imagine More Cards cartridge page 41 handbook.
Using the Birthday Bash cartridge I printed and cut the tag
page 39 handbook @ 5 inches. The pattern for the tag I used
the pattern on page 40 of the Imagine More Cards handbook.
The scallop was cut using the tag feature on
page 43 Birthday Bash handbook. Printed and cut @ 4.9 inches.
To make the cake I used the Imagine More Cards image on
page 2 in the handbook. I printed and cut the cake @ 3 inches
using the layer feature. I assembled the cake using pop dots.
The Happy Birthday was cut from the Image More Cards
cartridge. I used the image on page 10 in the handbook.
I used the layer feature and printed & cut only the layer
Happy Birthday Chick @ 3.5 inches. I used pop dots to adhere
the sentiment Happy Birthday to the card.
To embelish the card I used thin green and pink ribbon.


Saturday, February 26, 2011


Cricut Imagine


Imagine More


Imagine More Cards


Hopscotch


Country Carnival


Other Cricut cartridges


Boys will be boys


MS All Occasions cake art


Walk in My Garden


Imagine More- Sun was printed and cut using the layered feature. Image page 4 handbook.


Imagine More Cards- Journal tag- page 15 handbook.


Hopscotch- Cloud was printed and cut using the Imagine cloud shape.


Cloud print page 5 handbook.

Country Carnival- I printed a full sheet using the print on page 54 handbook. This was used to create the print background element at the base of the layout. Also to create the flowers and stems. The blue background card used for this layout was from my stash and was not created using the imagine.


Boys will be Boys- Trikes - page 36 handbook colour palette (Hopscotch) printed and cut 2.5. I used the fit to page feature to get all the cuts on one sheet of white card stock. The word zoom was printed and cut @ 1.3 colour palette (Hopscotch) Shadow was cut @ 1.4 rgb black.


MS All Occasions cake art-Grass colour palette (Hopscotch) printed and cut @ 1.5. page 85 handbook. Banneret printed and cut @ 1.5 colour palette (Hopscotch).


Walk in my Garden- Flowers cut @ 1.3 page 85 handbook. Caterpillar was printed and cut @1.4


Other items used to create this layout buttons, string, pop dots, ink Vera Color 55 Umber, Dimensional Magic and Pritt Gel.


Saturday, December 18, 2010


Snow Angel Imagine and George and Basic Shapes
.....
Base for the card Bazzill card cut @ 12 x 4 3/8 inch
Fold card in half and round the corners
.....
First layer basic shape Cricut Imagine
Pattern page 38 handbook
Printed and cut @ 5.8
Trimed to fit card and round the corners.
.....
Second layer Rectangle George and Basic Shapes page 100 handbook
Pattern page 36 Snow Angel Imagine handbook
Printed and cut @ 5.8 (round corners)
.....
Icon image page 31 Snow Angel Imagine handbook
Printed and cut @ 3.5
....
Snowman for inside of card page 11 S. A. handbook
Printed and cut @ 2.
.....
Other items used to make this card
ribbon, pop dots, adhesive, Pritt gel to adhere the bow.
I used my computer and printer for the sentiment
inside the card.


Cricut Imagine Snow Angel & George and Basic Shapes
Card base Bazzill card 12 x 4 1/4 inches folded in half
Rectangle-George and basic shapes page 116 handbook
Pattern for rectangle page 41 handbook Snow Angel
Printed and cut @ 5.8 x 4.3
Note mat basic shapes Cricut Imagine
Pattern page 43 handbook Snow Angel
Printed and cut @ 3.0
Scallop oval mat basic shapes Cricut Imagine
Print and cut base @ 2.6 colour palette Snow Angel (green)
Print and cut top layer @ 2.5 pattern page 43 handbook Snow Angel
Snowman (flip for front of card) printed and cut @ 2.2 page 11 handbook Snow Angel
I also printed and cut a Snowman for the inside of the card @ 2.0
Merry Christmas- Fundamentals Xmas stamp set
Other items used to make this card- pop dots, ribbon and adhesive
I used white card for the inside of the card cut @ 5 3/4 x 4 inches

Sentiment on the inside of the card reads
Wishing you a
Merry Christmas
and a
Happy New Year
I used my computer and printer to create the sentiment for the inside of the card. After I printed the sentiment onto the white card I adhered the Snowman to the bottom right hand corner. Then adhered it to the inside of the card.