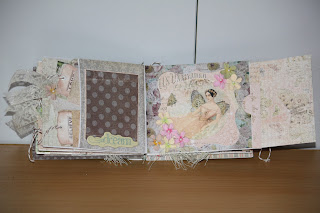
To create this album I used Fairy Belle by Prima. In each of the small pockets there is a photo mat, a large tag, 2 small envelopes with a tag in each. In the larger pocket there is a photo mat.To create the tags and the photo frames I used the Slice Elite by Making Memories. I used the 'Salutations' design card to create the tags for the small envelopes I used the 'Grandma's Attic' design card to make the photo frames. For the large tag I used the 'Basic Elements' design card. I used a Sizzix original die 'Library Card Pocket' for the small envelopes. To embellish the album I used lace ribbon, flowers, chipboard pieces, lace rub-ons, bakers twine, lace border punch and a Kaisercraft stamp set Miss Match-Bingo Cards.
Sunday, September 23, 2012
Envelope Mini Album
To create this album I used Fairy Belle by Prima. In each of the small pockets there is a photo mat, a large tag, 2 small envelopes with a tag in each. In the larger pocket there is a photo mat.To create the tags and the photo frames I used the Slice Elite by Making Memories. I used the 'Salutations' design card to create the tags for the small envelopes I used the 'Grandma's Attic' design card to make the photo frames. For the large tag I used the 'Basic Elements' design card. I used a Sizzix original die 'Library Card Pocket' for the small envelopes. To embellish the album I used lace ribbon, flowers, chipboard pieces, lace rub-ons, bakers twine, lace border punch and a Kaisercraft stamp set Miss Match-Bingo Cards.
Sunday, May 20, 2012
Birthday Card
To make this card
Card Base - core cards Pastels Card A2
Floral Mat - DCWV The Painted Petals Stack
cut @ 51/4 x 4 inches
Happy Birthday-Making Memories Slice words & expressions design card
happy cut @ 2 birthday cut @ 2.5
Butterfly-Making Memories Slice Applique Basics design card
Butterly cut @ 3 inches- embellished with Yellow Stickles
The butterfly was adhered to the card with pop dots.I cut out three of the flowers from the sheet of paper from the Painted Petals Stack and adhered those also to the card base using pop dots. These flowers are the small flower to the right, the large purple flower to the left and the purple flower above the butterfly. For the inside of the card I stamped the sentiment 'May your day be special' This stamp is from Stamp-It self cling rubber stamps. To stamp the sentiment I used Stampin up Vintage Violet.
Saturday, April 14, 2012
Rough Ashlars
In loving memory
Robert William Banks
7th January 1926 - 3rd January 2012
To create this scrapbook layout I used 'Times & Seasons' paper pack from Echo Park. I also used A C (American Crafts) cardstock for the base, tag and for embossing (red card) and ribbon. The embossing folder I used is from Tim Holtz Alterations. All the elements are from the paper pack. Just a note of interest - The photo I used was taken at Toombul Brisbane on the 25.9.1962 during band rehersal. Robert (Bob) Banks played the drums and melocida.
Pizza Box
Tags, Bags, Boxes & More 2
Pizza Box page 68 (hand book) Cut @ 10.5 Box Section 1 & 2
Pattern for top of the pizza box is from Cricut Imagine cartridge Hey Diddle Diddle floral design page 35 (hand book). I selected the pale pink from the Color Palette for the base of the box. When the box is assembled it measures 6.5 x 63/4 inches.
Cricut Imagine 'The Good old Days'
I made the tag using the image on page 7 (hand book). I used the layered feature and I changed the colour for the base of the tag using the pale pink. For the topper I used the pink & white dot pattern on page 44 (hand book). The tab was printed the same as in the hand book. I used a stamp for the sentiment 'Just a note to say...' on the tag which was stamped using pink ink. To embellish the tag I used a flower and button from Making Memories Blossom & Buttons 'Lemonade' and 3 flower stamens and white sheer ribbon. The tag was adhered to the pizza box with pop dots for dimension.
Sunday, February 26, 2012
Welcome card (Baby Girl)
This easel card measures 5.5 x 5.5. To make the base cut a piece of card stock 5.5 x 11. Score the card at 5.5 and 8 3/8. Cut another square 5.5 x 5.5 for the front of the card. The image for the front of the card is on page 25 of the Hey Diddle Diddle handbook. This was printed and cut @ 5. I printed the image combined twice and then cut the layers. I embossed the fence using an embossing folder by Craft concepts Woodgrain. I printed the fence twice. I cut the post off one of the images so I could emboss them the opposite way from the railings and to also raise them by using pop dots. One of the full images I cut the grass section off then ran that through an embossing folder by Cuttlebug 'Caramelo'. I inked the embossing folder using Vera Color ink 34 Orchard and 134 Petal Pink. I used the deboss side of the folder. I coloured the centre of the flowers using a pink gel pen. I applied Glossy accents to each flower to add dimension. I used glitter from Pink Paislee to embellish the cloud, the body and wool layers of the lamb. I also used Glossy accents on the lambs face. To make the Welcome sign I used the layer feature on page 13 of the handbook and used colours from the color palette. The word Welcome was cut from the image on page 27 of the handbook. The word welcome was adhered using pop dots onto the flag. The left side of the flag was adhered flat onto the fence post and I used pop dots on the right side to adhere it to the card. I tied the bow using a bow maker by docrafts. The bow was adhered to the fence using high tack tape. For the inside of the card I cut a piece of card 2.5 x 5 1/4. The words Little One was cut from the layer image on page 27 in the handbook. The base that the words are adhered to I used the icons available on the cartridge and selected the light pink from the color palette. This was cut @ 2.3 and I trimmed the top and bottom for a better fit. I used pop dots to adhere this assembled piece onto the pink card. I adhered the pink card to the inside base of the card using foam tape. To finish of the card I joined two white flowers together with a pink split pin and then used a pop dot to adhere it on the card.
Cricut Art Philosophy
Sizzix Hero Arts Stamp & die-cut Framelits
To make this tag I used Memento Rich Cocoa ink to stamp the sentiment Friend and the flower. To colour the flower I used a pink gel pen. I cut the tag @ 5 using the Cricut Imagine and the Art Philosophy cartridge. This tag can be found on page 60 in the handbook. The pattern on the tag is from the Cricut Imagine Greeting Cards Inside & Out. The pattern can be found on page 38 in the handbook. The diamond pattern border is from the Art Philosophy cartridge and it is on page 61 in the handbook. I used the pattern on page 37 and the blue from the color palette from the Greeting Cards Inside & Out. To assemble the tag I used pop dots to adhere the sentiment. The diamond borders are adhered flat to the tag. The flowers are also adhered flat onto the diamond border. Each flower has a small pearl (Hero Arts) placed in the centre.
Saturday, February 4, 2012
Birthday Card
This card was very simple to make. I just folded lime green card stock in half for the base of the card. I adhered a strip of brown card onto the base of the card. From the paper stack from My Mind's Eye 'Where The Heat Is' I cut a strip of the patterned paper with the houses and adhered that piece onto the brown card. I used the Cricut Expression 2 to cut out the pieces to create the little girl pushing the stroller. The number 3 was cut from the Mickey font cartridge. The Happy Birthday is a stamp. To make this element I just cut a strip of brown card for the base. Stamped the sentiment Happy Birthday onto a light brown card then cut that into a strip a little smaller than the brown card. Adhered the light brown and the base card together. To finish off the element I cut out the three little hearts from the same sheet of paper and adhered them on.
Junk Journal
Envelope - Cricut Imagine Country Carnival
Stampers Anonymous Tim Holtz Collections
Inside of the front cover
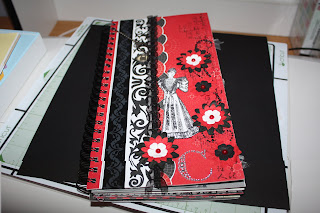
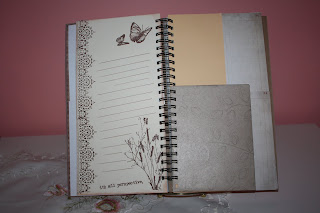
It was made with some new items and some I had saved in the stash. You know those things we just can't throw out and keep for another project. I also used the Cricut Imagine to print some pages and to create envelopes. The cartridges used Vintage Papers, Country Carnival (Imagine) and Plantin Schoolbook (envelopes) Stampers Anonymous Tim Holtz Collection stamps - Good Thoughts, Nature's Discovery and Floral Tattoo. Stamped with Memento Rich Cocoa. Edges inked with Vera Color Umber 55. The lace trim on the front of the journal a designer trim by websterspages. The butterfly I hand cut from the Vintage Timeless paper pad by Kaisercraft. The journal measures approx 12x6.5 for the front cover and the full pages measure 12x6. I used the Zutter and 1" wire to bind the journal.
Subscribe to:
Posts (Atom)