Monday, May 30, 2011


Happy Birthday Easel Card

KATE'S KITCHEN

Cricut Imagine

Card Base 12 x 6 inches scored @ 6 inch & 9 inch & one 6x6 square card

For the base of the card I used Bazzill card.

For the patterned layer on the base of the card I used the first pattern on page 43 (handbook). This was printed and cut @ 6 three times. I used the base layer image on page 19 (handbook) for the front of the card. This was printed and cut @ 5.2.

All other images

Recipe Box page 11 (handbook) printed & cut @ 2.

Cupcakes page page 19 (handbook) printed & cut @ 3 & 1.

For the 3inch cupcakes I also printed the icing/frosting layer.

The sentiment 'I was made just for you' page 19 printed & cut @ 4.

Bowl page 10 (handbook) printed & cut @ 1.5.

Rolling pin printed & cut @ 2.

Utensils page 11 (handbook) printed & cut @ 3.5 (combined image)

I also printed & cut the layer image utensils only.

Spoon page 12 (handbook) printed & cut @ 3.

Cook book page 12 (handbook) printed & cut twice @ 2.

Using scissors I cut around the front cover on one of these images inked around the edges using Versa color 55 Umber and used pop dots to adhere this to the other image for a layered effect.

Recipe Card page 26 (handbook) printed & cut @ 1.8

I adhered flat onto the recipe card a cupcake over the cherry print. Then I adhered the card onto the same color Bazzill card I used for the card base and cut around leaving a small border.

All the cut images I inked around the edges using Vera Color 55 Umber. Pop dots were used to adhere the Sentiment, the utensils, bowl, the small cupcake and the icing/frosting to the front of the card. For the inside of the card I cut a 6x2 inch piece of the pattern paper and adhered this to a 6 x 2 1/4 inch Bazzill card. To this I used pop dots to adhere the Cook book. The recipe card was adhered flat. This card was adhered to the inside of the card using pop dots. To finish off the card I used ribbon, 3 red buttons and brown string. I used My Pink Stamper 'Sweetest Cupcakes' stamp for the Happy Birthday on the front of the card.

Sunday, May 15, 2011


Cricut Imagine Buccaneer

Easel Card

Base for the card same as in my previous post. For the front of the card the pirate was printed and cut using the layer feature @ 4.8. The word "Arrrrrgh" was printed and cut @ 1.5. The bird was printed and cut using the layer feature @ 1.5. For the red stripe paper I printed a full sheet pattern page 35 (handbook). This was cut to 5 1/2 x 5 1/2. I also cut a piece of Core'dinations burnt orange card @ 4 1/2 x 5 3/4. For the inside of the card the Happy Birthday Matey was printed and cut @ 2.5. To make the decorate element for the card base I printed a full sheet of the pattern on page 39 (handbook). This was cut @ 5 inches then using scissors I cut around the bottom of the wave leaving a small amount of the black print as an edge. On top of that cut I adhered a small strip of the red stripe card 5 1/2 x 1/2 inch. I did this by using sticky tape at the back of the cuts to secure them to each other. I also adhered a small piece of the burnt orange to the left side using sticky tape. Then this element was adhered to black card leaving a narrow border at the top then once again cutting around the wave leaving a small edge (shadow). To assemble the inside base of the card I adhered a piece of the red stripe card which measured 5 11/16 x 5 13/16. Then I adhered a piece of the burnt orange card which measured 5 3/4 x 4 1/2 one inch from the top of the red stripe card. On top of the burnt orange card I adhered the decorate element using pop dots. I used pop dots to adhere the Happy Birthday Matey to the card. I used a thin strip of the red stripe card to create the checker effect at the base of the card. For the front of the card I adhered the burnt orange card on to the black card then I adhered the red stripe card. The layers for the pirate was adhered using pop dots. The assembled pirate was adhered to the card using pop dots. The layers for the bird was glued flat except for the top layer (birds face) I used a small pop dot and also a small pop dot for the buckle. I used pop dots to adhere the bird to the card.


Cricut Imagine Buccaneer

Easel Card

For the base of the Easel card I cut a piece of black card 12 x 6. I scored the card at 6" and 9". I cut a piece of black card 6 x 6 for the front of the card. I printed a full sheet of the red stripe card pattern page 35 (handbook). This was cut at 5 7/8 inch square and adhered on to the inside base of the card.

The pirate page 6 (handbook) was printed and cut using the layer feature @ 4.5. The wheel page 17 (handbook) was printed and cut using the layer feature @ 2.5. The keg/barrel page 20 (handbook) was printed and cut using the layer feature @ 1.8. The treasure chest page page 18 (handbook) was printed and cut using the layer feature @ 2. The wooden planks page 26 (handbook) was printed and cut @ 3.3. The bottles page 33 (handbook) was printed and cut @ 1.3. Shivers me Timbers page 24 (handbook) was printed and cut @ 1.3. Happy Birthday Matey was printed and cut @ 2.5 page 25 (handbook).

To assemble the card a wooden plank was adhered flat on the front of the card. The wooden plank on the inside of the card was adhered using pop dots. Happy Birthday Matey and the bottle on the inside of the card was also adhered using pop dots. The wheel was assemble using pop dots for the layers. The assembled wheel was adhered flat on the card. The pirate was assembled using pop dots for the layers. The assembled pirate was adhered to the card using pop dots except for his hand behind the treasure chest it was glued flat on to the wooden plank. The treasure chest was assembled using pop dots. It was adhered to the card using pop dots. For the keg/barrel the layers were glued flat. I cut off the burning wick and adhered the skull. The skull is from the pirate flag page 21 (handbook). For the bottle near the treasure chest I adhered it flat onto the card the other bottle was adhered using pop dots.


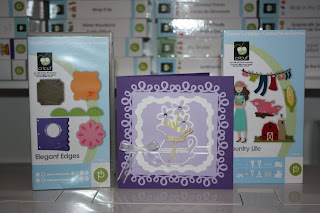
Elegant Edges & Country Life

Cricut Imagine


To make this card I used the project on page 9 (handbook) Elegant Edges but I made each cut smaller so they would fit onto a card. Base card- Bazzill Purple card 5 3/8 x 5 3/8. I used Epson PremierArt 12 x 12 Scrapbook Photo paper for the Imagine print and cuts. Using the Imagine I used RGB: 176 153 201 Frosted Amethyst to print and cut the Loops mat @ 5 page 35 Elegant Edges (hand book) and the smaller shadow mat printed and cut @ 3. The white shadow mat was cut @ 3.5. The pitcher was printed and cut twice @ 3 page 60 Country Life (handbook) using the same RGB code. I also printed a green pitcher for the flower stems. I printed Layer 1 & Layer 2 twice. Once using an off white colour and once using the Frosted Amethyst RGB code. The shadow was cut using white card. To assemble the jug I adhered the green pitcher onto the white shadow. Then I adhered one of the Frosted Amethyst pitcher onto the green pitcher. I adhered the off white flower on top of the green flower and finally adhered the Frosted Amethyst flowers on top. Faux chipboard effect. I added a clear Kaisercraft Rhinestones to the centre of each flower. For the pitcher on top I wrapped a small piece of raffia around adhered on the off white pieces from Layer 1 & 2 then adhered it on top using pop dots. I also used pop dots to adhere the assembled pitcher onto the card. The bow was adhered to the card using Pritt Gel glue. To finish off the card I printed and cut a square @ 5 using the Frosted Amethyst RGB with the imagine. Then I created a sentiment using Print Shop 22. The sentiment reads Wishing you a very Happy Birthday. I printed the sentiment onto the Frosted Amethyst square using my printer. This was adhered to the inside of the card.

Monday, May 2, 2011


Cricut Imagine Lori's Garden


Cricut Cake Holiday Cakes


Plantin Schoolbook


Mothers Day Card, envelope and gift


The envelope

To create the envelope I printed a doubled sided 12x12 sheet of card using the pattern on page 43 of the handbook and the yellow floral pattern on page 44 of the handbook. For the envelope cut I used Plantin Schoolbook Cricut cartridge in the Cricut Imagine and used the cut only feature. This envelope is on page 79 of the handbook (Plantin Schoolbook). I also used the fit to page feature which cut the appropriate sized envelope for the card.


The card

For the base of the card and the smaller pink mat I used Color Mates Deep Fairy Tale Pink card. The base card measure 6" x 4 3/8". Floral print on top of the base card same as the pattern I used for the envelope. Small pink mat was cut @ 5 1/4x 4". Yellow floral print on top of this mat same as the print for the envelope. To make the pink lace scallop I used Martha Stewart Lace border punch. Ribbon was adhered along the lace border and a small piece of ribbon was knotted around. I used the image on page 22 handbook (Lori's Garden) for the top layer. This was printed and cut @ 4. using the layer feature. The sentiment Happy Mothers Day is from the Holiday Cakes cartridge page 70 (handbook). I printed this directly on to the yellow floral print paper using the print only feature on the Imagine. For the inside of the card I printed and cut 2 of the floral mats and one of the yellow floral mats. I printed a sentiment on to the yellow floral mat using Print Shop 22 and my printer. I printed and cut the rose on page 8 of the handbook (Lori's Garden) using the layer feature @ 1.5 and adhered this on the inside bottom right hand corner.


The Gift

To create the box for the gift I printed a full sheet of the floral print page 43 Lori's Garden handbook. This was cut to measure 10" x 8". I scored the card to help fold it to create the box. I wrapped it around the gift then I adhered it together with strong tacky tape. To create the fold at the top and bottom of the box I cut along each corner and folded each flap in then used the tacky tape to adhere each end down. To embellish the box I used one strip of pink and white card stock and edged both with the Martha Stewart Lace border punch. I scored these strips to wrap around the box. I adhered on the ribbon and tied a small piece of ribbon. The rose was printed and cut @ 1.8 using the layer feature and was adhered using pop dots.